Score that secondhand dryer for a fraction of retail price, but don’t skip the most crucial maintenance step that keeps your thrifted appliances running safely and efficiently. A clogged dryer vent isn’t just an energy vampire—it’s a serious fire hazard that sends thousands of families scrambling each year. Before you panic and call in the pros at dryerventcleanexperts.com, know that cleaning your dryer vent is totally doable with basic tools you probably already own.
Your preloved dryer deserves the same TLC as a brand-new model, and honestly, DIY vent cleaning saves you serious cash while keeping your household safe. Whether you snagged your dryer at a garage sale, estate sale, or online marketplace, previous owners may have neglected this essential task. Lint buildup reduces efficiency by up to 75%, meaning your energy bills skyrocket while your clothes take forever to dry.
The good news? You can tackle this project in under an hour with supplies costing less than twenty bucks. From simple brushes to vacuum attachments, we’ll walk you through budget-friendly methods that work just as well as expensive professional equipment. Let’s dive into practical, eco-conscious strategies that keep your thrifted treasure performing like new while protecting your home and family.
Why Your Thrifted Dryer’s Vents Need Extra Love
So you scored an amazing deal on a gently used dryer at the thrift store or marketplace—congratulations! But here’s the thing nobody tells you when you’re celebrating your bargain-hunting victory: that beauty probably comes with a hidden souvenir from its previous life. We’re talking about the lint legacy left behind by the former owner.
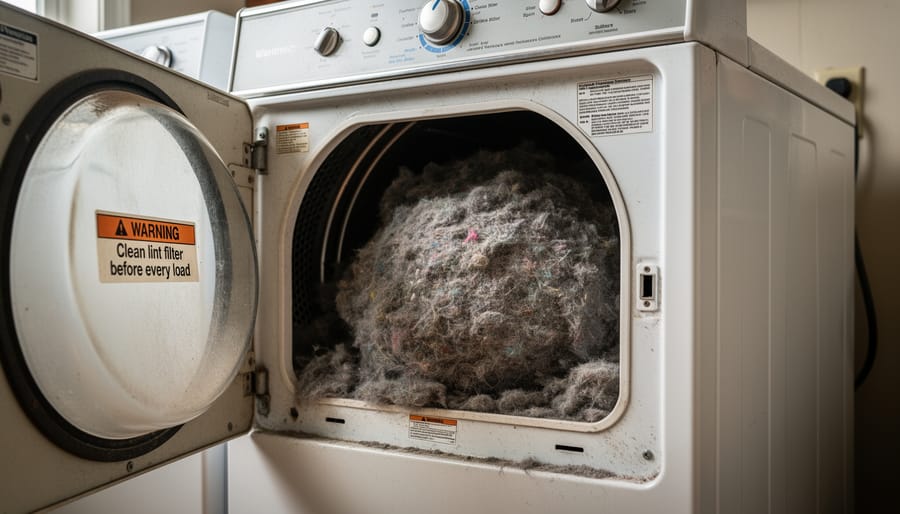
Think about it. When was the last time someone deep-cleaned their dryer vent before selling or donating it? Exactly. Most secondhand dryers have been working overtime with zero maintenance love, and their vents are often packed with years of accumulated lint and debris. It’s like inheriting someone else’s dust bunnies, except these bunnies are potential fire hazards.
Here’s where things get serious for a second. Clogged dryer vents are responsible for thousands of house fires every year. That fluffy lint is surprisingly flammable, and when it builds up inside your vent system, it creates the perfect conditions for disaster. Your thrifted treasure could literally be a ticking time bomb if those vents aren’t properly cleaned.
But it’s not just about safety. A gunked-up vent means your dryer has to work way harder to do its job, which translates to longer drying times and higher energy bills—definitely not what you signed up for when choosing the eco-friendly secondhand route. Plus, all that extra strain wears down your appliance faster, cutting short the lifespan of your thrifted find.
The good news? A thorough vent cleaning is totally doable on a budget, and it immediately transforms your secondhand dryer from a potential problem into a dependable workhorse that’ll serve you well for years to come.
Thrifty Tools You Already Own (Or Can Borrow)
The Free Stuff in Your Closet
Before you hit the store or pull out your wallet, take a peek around your house! You probably already have everything you need to give that dryer vent a thorough cleaning. I raided my own closet last month and found my dryer-cleaning toolkit hiding in plain sight.
Those wire hangers collecting dust? Perfect for creating a makeshift vent brush. Just unwind one and straighten it out, then wrap an old towel or rag around the end and secure it with a rubber band. Boom—instant vent snake! This is one of my favorite DIY cleaning solutions that costs absolutely nothing.
Your vacuum cleaner with its hose attachment becomes your lint-sucking superhero. And that flashlight rattling around in your junk drawer? Essential for spotting all the lint hiding in dark corners. Old towels work double-duty for wrapping around hangers and catching falling debris.
I love that these repurposed cleaning supplies turn everyday items into effective maintenance tools. No fancy equipment needed—just a little creativity and whatever’s already hanging around your home!
Worth the Small Splurge
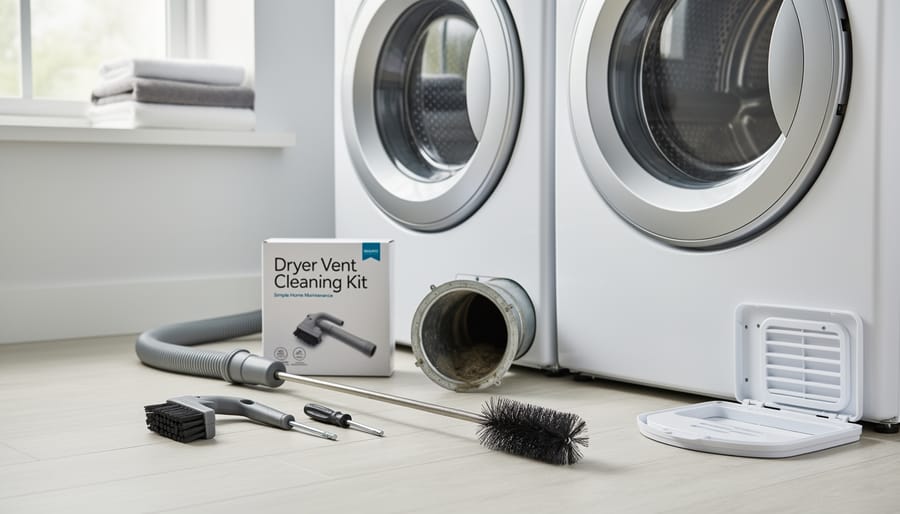
Here’s the good news: keeping your dryer vent clean doesn’t require fancy equipment or a big investment. A basic dryer vent cleaning kit typically runs under $20 and can last for years. Look for kits that include a flexible brush attachment and extendable rods that can reach deep into your vent system.
I snagged my first vent cleaning kit at a garage sale for just $3, and it’s still going strong three years later! You can often find these tools at thrift stores, estate sales, or even on Facebook Marketplace from folks who’ve upgraded their cleaning supplies. Hardware stores like Home Depot and Lowe’s frequently run clearance sales on these items, especially at the end of summer.
If you’re buying new, watch for coupons and compare prices online. Amazon and Harbor Freight both offer budget-friendly options under $15. The rotating brush heads are game-changers for loosening stubborn lint buildup. Even dollar stores sometimes carry basic vent brushes that work perfectly for regular maintenance cleaning.
Think of this small investment as preventative care that could save you hundreds in fire damage or appliance replacement costs down the road. Your thrifted dryer deserves quality maintenance without breaking the bank.
Your Step-by-Step DIY Dryer Vent Cleaning Adventure
Prep Work: Getting Your Dryer Ready
Before you dive into cleaning your thrifted treasure, let’s get everything set up safely. First things first: unplug your dryer from the wall outlet. I know it sounds obvious, but trust me, you don’t want any surprises while you’re working. If your dryer is gas-powered, turn off the gas valve too.
Now for the fun part – time to channel your inner superhero and pull that dryer away from the wall. You might want to grab a friend for this step, especially if you scored one of those heavy-duty models. Slide it out gently to give yourself plenty of room to work. Pro tip: lay down an old towel or cardboard underneath to protect your floors.
Next, disconnect the vent hose from the back of your dryer. Most dryers use a simple clamp system that you can loosen with a screwdriver or even by hand. Don’t worry if you see some lint tumbleweeds – that’s exactly why we’re here. Keep track of any screws or clamps by dropping them in a small bowl.
Finally, set up your cleaning station. Grab a trash bag for all that collected lint, and keep your vacuum nearby. Having everything within reach makes the whole process smoother and way less frustrating.
The Inside Job: Cleaning the Dryer Itself
Here’s the thing about thrifted dryers—they’ve lived a whole life before landing in your laundry room, and chances are, they’re hiding lint in places you didn’t even know existed! While everyone knows about the lint trap, the real magic happens when you dig a little deeper.
Start by removing your lint trap completely and peeking into that dark cavity where it sits. See that fluffy buildup clinging to the walls? Grab your trusty vacuum with a crevice attachment and get friendly with those corners. If you’re feeling extra ambitious, wrap a microfiber cloth around a long, thin stick (like a ruler or yard stick) and gently wipe down the inside walls.
Next, check any accessible internal areas. Unplug your dryer first—safety always comes first! Remove the front or back panel if you’re comfortable doing so (YouTube is your friend here), and vacuum around the drum and any visible lint accumulation. You’d be amazed what your secondhand treasure has been collecting.
Pro tip from my own thrifting adventures: I once found an entire sock lodged in my inherited dryer’s internals. Mystery solved! This inside cleaning isn’t just about efficiency—it’s fire prevention and helping your budget-friendly find run like new for years to come.
The Vent Pipe Mission
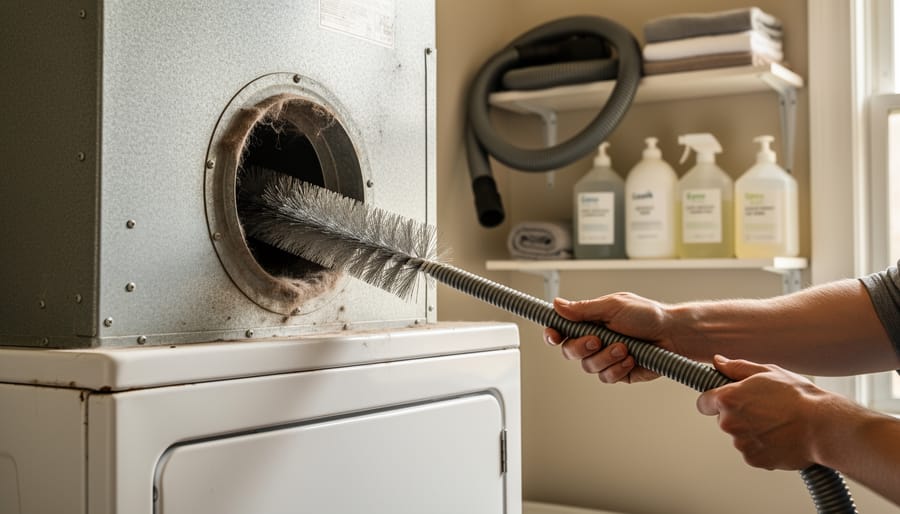
Now comes the fun part – tackling that vent pipe itself! This is where your thrifted dryer really benefits from some TLC. Grab your dryer vent cleaning brush (you can find these at dollar stores or home improvement shops for just a few bucks) and let’s get to work.
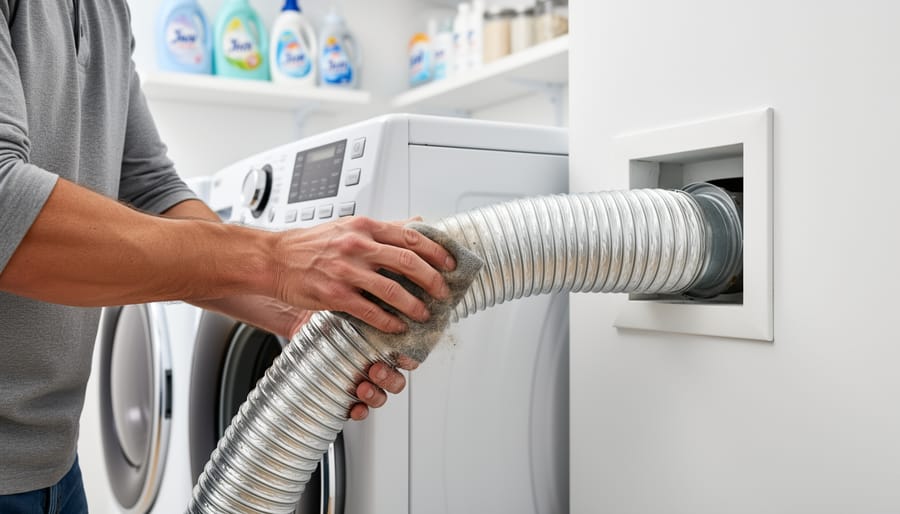
Start by disconnecting the flexible vent hose from both the dryer and the wall outlet. Give it a good shake outside to dislodge loose lint – you’ll be amazed at what falls out! Thread your brush through the entire length of the hose, rotating as you go. If you don’t have a specialized brush, a wire coat hanger wrapped in a damp microfiber cloth works surprisingly well. Just straighten the hanger, create a small hook at one end, and gently push it through while twisting.
For the rigid ductwork leading outside, insert your brush from both ends if possible. Use your vacuum’s hose attachment to suck up dislodged debris as you work. Here’s a game-changer tip: leaf blowers can blast stubborn blockages right out when other methods fail – just have someone outside ready to catch the lint explosion!
Dealing with a particularly stubborn clog? Mix warm water with a drop of dish soap, dampen your brush slightly, and work it through the affected area. The moisture helps clump the lint together for easier removal. Just make sure everything dries completely before reassembling – nobody wants a mildew situation in their vent system!
The Outdoor Finale
Head outside to finish strong! Grab your trusty screwdriver and carefully remove the exterior vent cover. You might be surprised what you find tucked behind there—I once discovered an entire bird’s nest that had turned my dryer into a feathered roadblock. Gently pull out any leaves, lint clumps, or debris you spot. Give the cover itself a good wipe-down with a damp cloth to remove caked-on grime.
Here’s a quick test to ensure everything’s working beautifully: turn on your dryer and head outside. You should feel strong airflow pushing out from the vent. If it’s weak or barely there, you might have a blockage deeper in the ductwork. Once you’ve confirmed good airflow, reattach the cover securely. This simple outdoor check keeps your thrifted dryer running efficiently and prevents potential fire hazards—all without spending a dime on fancy tools!
Red Flags: When to Call in the Pros
Look, I’m all about the DIY life and saving money wherever possible, but sometimes calling in a professional is actually the smartest move for your wallet and safety. Here’s when it’s time to pass the baton.
If your dryer vent runs longer than 25 feet or has multiple twists and turns, a professional has specialized equipment that can reach what your DIY brush simply can’t. I learned this the hard way when my thrifted dryer took forever to dry clothes, even after I cleaned what I could reach. Turns out, my vent snaked through three walls with lint packed deep inside.
Got a rooftop exit? That’s definitely pro territory. No thrifty find is worth risking a tumble off your roof. Same goes if your vent exits through a second or third story.
When you’re dealing with persistent clogs that keep coming back after cleaning, there might be damage to the vent system itself, like crushed sections or disconnected joints. Professionals can diagnose and fix these hidden issues.
If you scored a dryer that clearly hasn’t been maintained in years and it’s taking three cycles to dry a single load, heavy neglect often means serious buildup. A deep professional cleaning gives you a fresh start, and then you can maintain it yourself going forward.
Here’s the thing: professional vent cleaning typically costs between 90 and 200 dollars, but a house fire from a clogged vent or constantly running your dryer multiple times costs way more. Think of it as investing in your thrifted treasure’s longevity. You’re not admitting defeat by calling the pros; you’re being smart about when specialized help makes sense.
Keep It Clean: Your Thrifty Maintenance Schedule
The secret to keeping your thrifted dryer running smoothly? Think of maintenance like brushing your teeth—little efforts add up to big results, and you’ll avoid costly surprises down the road.
Start with a monthly quick-check routine that takes just five minutes. Pull out the lint trap and give it a good vacuum around the edges where sneaky buildup hides. Peek behind your dryer to make sure the vent hose hasn’t gotten kinked or crushed. I like to set a phone reminder on the first of each month—easy peasy.
When the seasons change, schedule a deeper clean. Spring and fall are perfect times to disconnect that vent hose and shake out any accumulated lint. Run your vacuum’s crevice tool through the ductwork as far as you can reach. This twice-yearly ritual protects your secondhand investment and keeps energy bills in check.
Here’s a game-changing daily habit: after every load, wipe down your lint trap with a damp cloth. Dryer sheets leave an invisible film that blocks airflow, making your machine work harder. Once a month, give the screen a gentle scrub with dish soap and an old toothbrush.
Keep a small notebook near your laundry area to track cleaning dates. Sounds nerdy, but you’ll thank yourself when you can’t remember your last deep clean. Plus, if you ever need to troubleshoot issues, you’ll have a maintenance history at your fingertips. Small habits, big savings—that’s the thrifty way.
Look at you! You’ve just mastered one of the most important skills in sustainable homeownership: keeping your thrifted dryer running safely and efficiently. Give yourself a well-deserved pat on the back, because what you’re doing is genuinely awesome.
By maintaining your secondhand dryer, you’re not just saving money on your energy bills and preventing potential fire hazards. You’re also making a powerful statement about the kind of world you want to live in. Every time you clean that vent, you’re extending the life of an appliance that might have otherwise ended up in a landfill. That’s a real environmental win, and it deserves to be celebrated.
Think about it: you’ve chosen to breathe new life into a preloved appliance, learned to care for it yourself, and now you’re reaping the rewards of lower utility costs and peace of mind. That’s the beautiful cycle of thrifty, sustainable living. You’re proving that secondhand doesn’t mean second-rate, and that taking care of what we already have is one of the most responsible choices we can make.
Remember, every dryer you maintain is one less dryer in a dump and one less new appliance being manufactured. Your commitment to caring for your thrifted finds isn’t just smart budgeting; it’s genuine environmental stewardship. Keep up the fantastic work, and enjoy the cozy warmth of clothes dried in your well-maintained, budget-friendly machine.